和歌山 利宏
1954年滋賀県生まれ。国際A級ライセンス所持。F-1マシンの開発、タイヤ開発のテストライダー等をつとめた。現在、フリーのジャーナリスト。
(1987/6) ライダーのためのバイク基礎工学
(1989/1) ライダーのためのバイク進化論―バイク基礎工学パート2
(1990/6) ライディングの科学
(1992/4) 図説 バイクのメカニズム
(1993/12) サーキットライディングを科学する
(1994/12) 図説バイク工学入門
(2003/4) タイヤの科学とライディングの極意
amazonと国会図書館の検索結果は同じで上記7冊。
ライダーのためのバイク基礎工学
図解バイク工学入門
4ストローク・レーシングマニュアル 4ストローク・レースチューニングの実践と理論
ジュエル・ヘンドリックス (著), 小川 文夫 (訳)
発行年月:1989
(1988/08) SUPERBIKE PREPARATION
Jewel Hendricks
MRP (Motor Racing Publications)
As we know him in sohc4 from his “mantlepiece” article and his photo with his racing 550/591 (it done a 12.03 ET if you can believe that…), I thought that this was written in 70’s but it turns out that its from 1988 so deals with much more modern stuff like GSXR’s and FZ’s.
http://www.britishracecar.com/pauldudiak-mckee-mk12c.htm
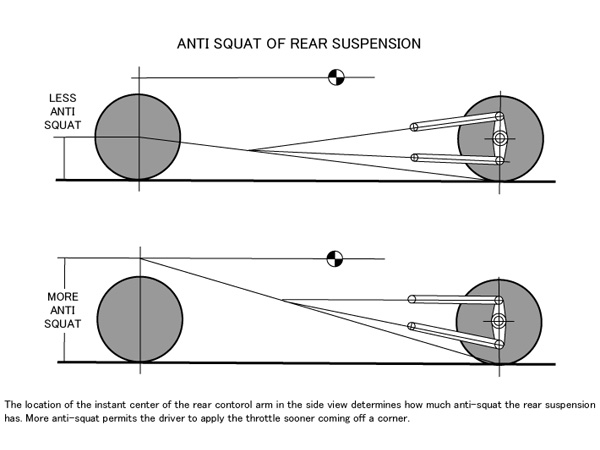
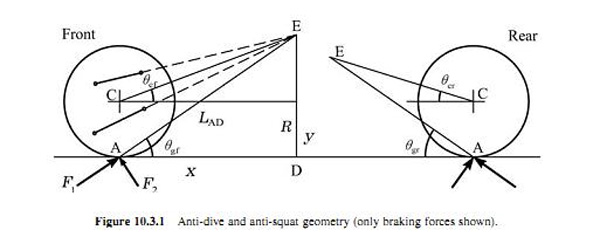
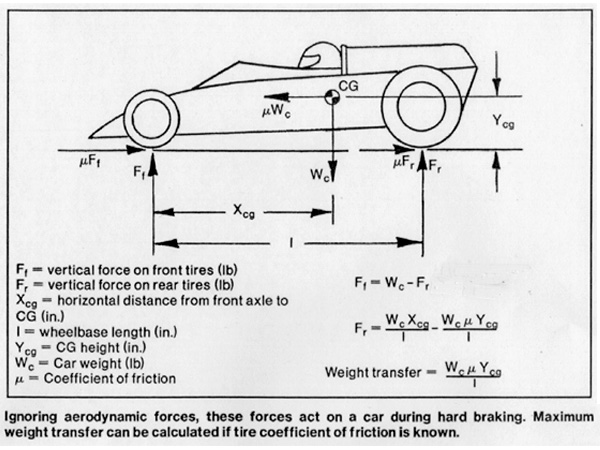
In 1969, anti-dive and anti-squat were still new concepts. After the Ford GT40, the McKee Mk12 was one of the pioneering cars to have both anti-dive and anti-squat built in. In a nutshell, the principle of anti-dive is that front suspension mounting points can be located strategically so the torque reaction of braking partially cancels the suspension’s tendency to plunge downward. Anti-squat is essentially the same thing, except applied at the rear to help keep the car level under forward acceleration. Designers experimented with anti-dive and anti-squat for better ride and to reduce camber and toe change, and their steering effects which occur as cars take corners. But anti-dive in particular isn’t something for nothing: too much anti-dive causes cars to be “darty” and can make cars hypersensitive to bumps. It’s a balance. Modern racecars use very little anti-dive.
http://www.sportrider.com/tech/146_0404_motorcycle_traction_geometry/
As sportbikes become more and more powerful, rear-end geometry plays a greater part in determining how well that power gets to the ground. Some production bikes now have adjustable swingarm pivots, which is one part of the equation, and while the pivot height–which can be used to change the swingarm angle–plays an important role in antisquat geometry, there is much more to consider.
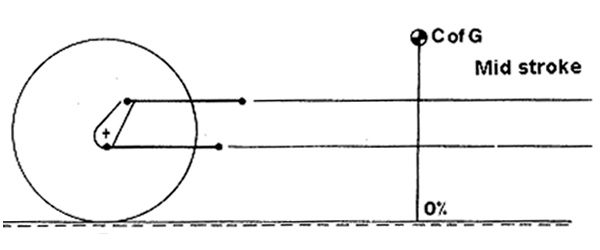
The reasoning behind antisquat is as follows: When you get on the gas exiting a turn, that acceleration results in weight transferring to the rear wheel, commonly called squat. While a certain amount of squat loads the rear suspension and improves traction, too much can unload the front wheel and have you running wide on the turn exit–or worse. Today’s literbikes can easily transfer all their weight rearward (a good thing if you’re into wheelies), and left unchecked, that weight transfer would spell disaster on turn exits. How much weight is transferred under acceleration is dependent on the wheelbase and the relative position of the bike’s center of gravity. To stop the rear suspension from squatting too much, a certain amount of antisquat–working against that weight transfer–is desirable.
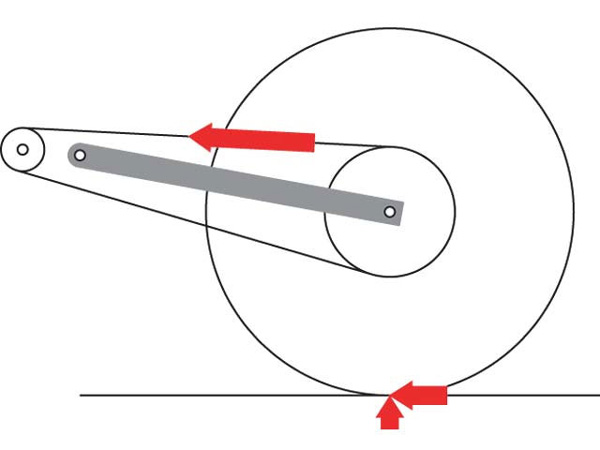
Figure 1
The three forces all act on the swingarm at the rear axle, and their moments about the swingarm pivot can be calculated. As the rear suspension compresses, the geometry of the force diagram changes–sometimes significantly. Note that while the chain pull always creates an antisquat tendency, the driving force torque changes from antisquat to pro-squat as the suspension compresses and the swingarm passes horizontal.There are two forces in the rear end that can be utilized–and even tuned–to nicely counter that weight shift. One is the driving force, or thrust, that pushes the rear wheel forward. Because the swingarm is at an angle to the ground, a portion of that forward thrust acts to lift the back of the bike–much as you can push horizontally on the bottom of a ladder against the side of a building to raise the ladder more. Like the ladder, the greater the angle of the swingarm, the more force is transferred into lift.
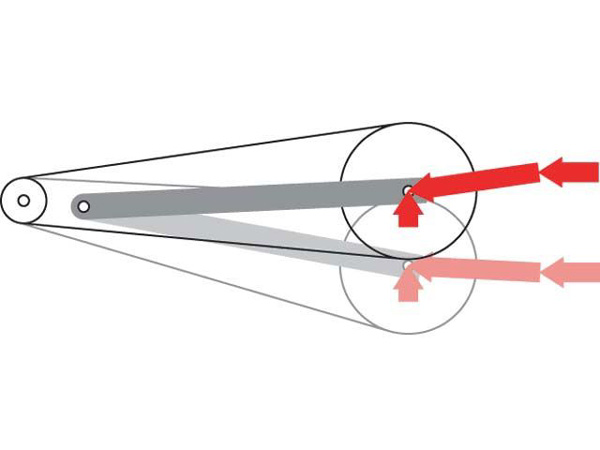
Figure 2
The second force that can be used is chain pull, which also acts to extend the suspension as it tries to pull the rear wheel in the direction of the top chain run. This force’s magnitude is dependent on the relative sizes of the rear tire and rear sprocket, and its direction is determined by the sizes of the front and rear sprockets. Weight transfer manifests itself as the ground pushing upward on the rear wheel–compressing the suspension–and all three forces are proportional to the amount of acceleration. Figure 1 shows a typical sportbike rear end and the three forces (weight transfer, driving force and chain pull), with the lengths of the red arrows representing the magnitude and direction of each.
We can make some assumptions to isolate the forces that act on the swingarm and, using some measured dimensions–from a Kawasaki ZX-6R, in this case–calculate the resulting torques that are trying to rotate the swingarm around its pivot. The force diagram in Figure 2 shows that as the suspension is compressed, the three forces move in relation to the swingarm pivot, and while the magnitude of each force does not change, its orientation–and hence the applied torque–does. Figure 3 shows a plot that represents the three torques against the suspension’s travel for a typical sportbike, with a positive value representing a torque that is trying to extend the suspension–antisquat–and a negative value representing pro-squat.
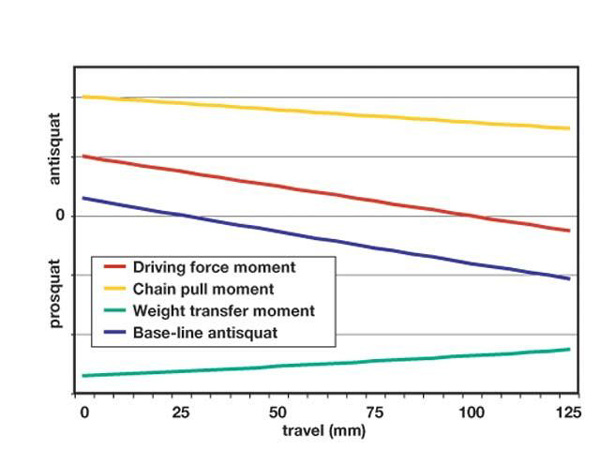
Figure 3
The three torques plotted against suspension travel, along with their sum, the base-line antisquat for the Kawasaki ZX-6R. The chain pull has a much greater influence than the driving force moment, showing how sprocket selection on a big bike can drastically affect handling.To consider the overall squat tendency, it’s convenient to express the total antisquat in terms of a percentage of the pro-squat weight transfer. In a practical sense, a value of 100 percent means that when you get on the throttle, the antisquat will nicely offset the weight transfer and your suspension will neither compress nor extend–and that applies for any amount of acceleration. A value greater than 100 percent indicates the suspension will extend proportional to the amount of acceleration, and vice versa for values less than 100 percent. Taken to the extreme, zero percent is the point at which there is no antisquat–the suspension is free to compress under any weight transfer. Graphing the antisquat percentage in Figure 4, we see that the overall tendency is toward less antisquat (or, rather, pro-squat) as the suspension is compressed, with a neutral value at approximately 30mm of travel.
We know what you’re thinking now–that the farther down you go in the travel, there is pro-squat pulling the suspension down even farther. Isn’t that backward to what you want? In a nutshell, yes–you’d ideally want more antisquat farther down in the suspension travel, and this is one reason why most suspension systems have rising rate built in–to offset the increasing pro-squat. The ideal motorcycle would have either a constant squat tendency for the full suspension travel (a flat line), or a curve that rises the farther into the travel you go. That, however, would require a layout presenting more problems than it would solve–the swingarm pivot would have to be in front of the countershaft sprocket, for one.
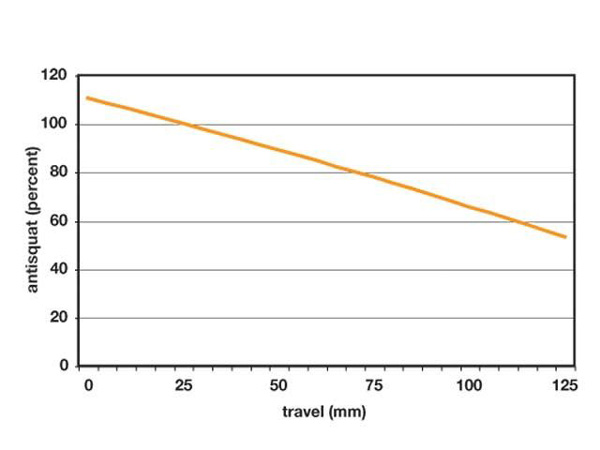
Figure 4
Antisquat expressed as a percentage of the pro-squat due to weight transfer. One hundred percent indicates the antisquat forces nicely offset the weight transfer, and the suspension will neither compress nor extend under acceleration. Note that the squat tendency for this ZX-6R is neutral just at the value of suspension travel that corresponds to rider sag.At some level of squat, there is an acceptable balance of additional weight on the rear end for traction and sufficient weight on the front end for steering. Keep the amount of squat in that zone and life is good; stray too far in either direction and you’ll be fighting your bike. Knowing the forces involved in a common sportbike layout, we can look at some of the variables that affect antisquat and see how sensitive it is to certain changes.
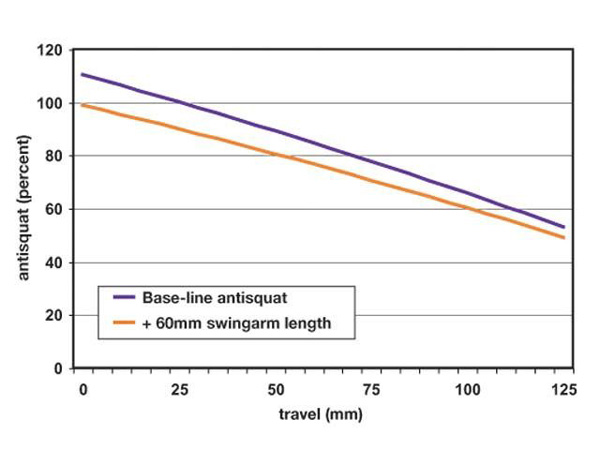
Figure 5
Figure 5 shows one way to approach the ideal flat antisquat curve–by increasing swingarm length. This is one reason manufacturers work so hard to make swingarm length as long as possible within a given wheelbase.
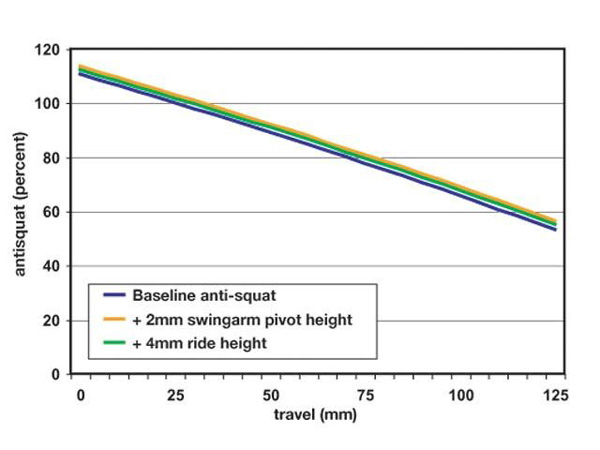
Figure 6
Figure 6 shows what effect raising the swingarm pivot or raising the whole bike on its suspension has. Both change the swingarm angle, a big factor in the amount of antisquat, but you can see that a small change in swingarm pivot height can have the same effect as a drastic ride-height adjustment.
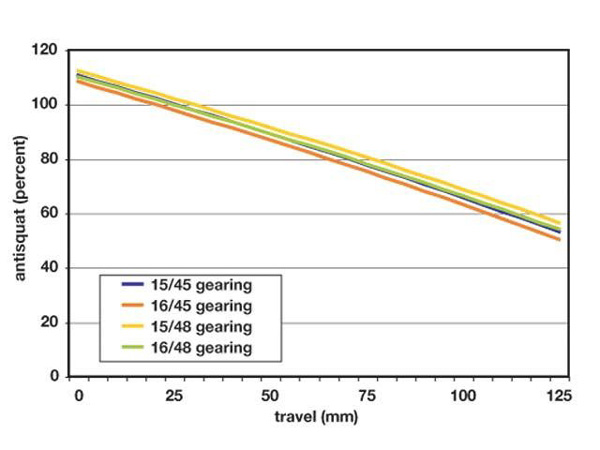
Figure 7
Figure 7 shows the effects of different gearing selection; in general, a smaller front sprocket or larger rear sprocket increases antisquat, but changing sprockets while keeping the same ratio has little overall effect. Note that a minor gearing change can affect antisquat just as much as changing the swingarm angle, and the ramifications of such a change should always be considered, especially when dealing with a powerful bike.
Read more: http://www.sportrider.com/tech/146_0404_motorcycle_traction_geometry/#ixzz25CF1ngBu
